|
Buster the Bunny
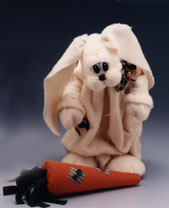
DOWNLOAD PATTERN Designed By: Debi Schmitz
Typical Project Completion Time: 2-4 hours
(does not include drying time)
MATERIALS NEEDED:
STYROFOAM* Brand Products:
2 Cones,12" x 4"
2 Eggs, 5 7/8" x 3 7/8"
2 Eggs, 3 1/16" x 2 5/16"
1 Ball, 3"
1 Ball, 2"
Other Materials:
Felt: 1 yds. antique white shaggy plush; 1 18" square orange; 1 9" x 12" sheet Kelly green
1 Pair of comical mouse eyes, 28 x 42mm
1 Animal nose with shank, 18 mm black
8 Buttons, assorted
Cotton fabric: 1 3" x 1 yd. torn strip; 5 coordinating scraps for patches
Permanent marker, black
2 yds. of pearl cotton or crochet thread, tan
Quilting thread, tan (very strong)
Needle
Wire: 26-gauge and 18-gauge
Serrated knife
Table knife
Scissors
Wire cutters
Low temperature glue gun and glue sticks
Thick, white craft glue
INSTRUCTIONS:
1. Using serrated knife, cut the foam pieces as follows (hint: for smoother cuts, wax the knife blade first with an old candle):
a. Cut one large egg in half lengthwise. Cut off 2" from pointed end. See Diagram 1. (Feet)
b. Cut in half the 3" and 2" balls. (Tail and cheeks)
c. Cut a notch out of the pointed end of each 3 1/16" egg. See Diagram 2. (Hands)
2. Feet: Place foot, round side down, in center of 8" square of shaggy plush felt (SP). Pull SP as flat as possible around the front, rounded edge (toes); glue to bottom of foot. Stretch and gather the remaining SP toward the back of the foot; glue to bottom of foot. Trim excess SP, making sure the bottom of foot is as flat as possible. Using a table knife, press toe lines into the front of foot. Repeat for other foot.
3. Hands: Bend over 1" on ends of 18" length of 16-gauge wire. Insert and glue wire loop into the wide end of a hand. Place the hand in the center of a 9" square of SP. Using white craft glue, securely glue the center of SP into the notch of the hand. Let dry. Carefully pull and stretch the SP around the egg towards the wire twist. Wire tightly with another length of wire; cut off excess wire. Repeat for other hand.
4. Arms: With right sides together, glue the long edge of a 10" x 36" piece of SP. Let dry. Turn right side out and thread onto hands. Fold under 2" on each end; wire tightly at the wrist. Glue a 1" x 8" SP strip around wrist over wire; cut off excess SP. Bend a 9" length of 16-gauge wire around center of the arm piece. Glue and insert ends into the top of the cone from the sides; secure with another piece of wire if needed. (Be careful not to break the top of the cone.)
5. Tail: Cover the 3" half ball with a 5" square of SP as in Step 2 for the feet.
6. Center and glue a 9"square of SP to the bottom and sides of one large cone.
7. Head: Bend a 1" loop into end of 12" length of 16-gauge wire. Following Diagram 3, glue and insert wire loop into large egg (head). Glue the 1 1/2" half balls on head for cheeks. Cut a 15" x 22" piece of SP. Spread craft glue on and around cheeks. Center SP over cheeks, positioning felt lengthwise; press and shape felt onto cheeks. When securely attached to cheeks, stretch SP around head, pullng tightly to the neck. Secure with wire tie; cut off excess fabric. Cut neck wire to 6"; glue and insert wire into top of cone in front of the arm piece (Do not break off the top of the cone.)
8. Body: With right sides together, glue together the short sides of a 20" x 36" piece of SP. Let dry; turn right side out. Lay SP tube on work surface with the glued seam in the center. Following Diagram 4, cut a 6" slit in each side at one end of the tube (arm holes). Using a doubled or tripled thread, tightly gather the uncut end of the tube; knot and secure. Insert wide end of cone into fabric tube; glue. Gather the top edge of tube, placing arms through the arm slits; gather tightly around the neck. Knot and secure the thread.
9. Insert and glue a 3" length of 16-gauge wire into the center of the tail. Glue tail to bunny. Glue feet to front of the bunny using 5" lengths of wire.
10. Cut two 4" x 15" strips of SP; round edges on one end for ears. Gather opposite end together and wire rightly with a 2" length of 16-gauge wire. Poke a small hole in head, slightly off center; glue and insert wired end of ear. Repeat for other ear.
11. Tie together in the center five 12" lengths of cotton thread. Using fingers, spread craft glue on threads, wiping off excess. When dry, glue knot to face where the tops of cheeks meet. In the same location, poke a small hole and glue nose shank into hole. Poke two small holes in head for eyes; glue shanks into head. Cut eyelids using Pattern A; glue onto eyes.
12. Tie fabric strip around neck, making a bow; trim ends. Glue three patches onto bunny; embellish patches with buttons.
13. Carrot: Cut orange felt into a triangle, following Diagram 5. Place cone on felt, with points going in the same direction. Fold the felt point up onto the cone and glue. Fold the sides of the felt in and roll cone in felt. Using serrated knife, carve a 1" deep hole into center top of carrot; pull felt tightly and glue into hole. Cut green felt into six 12" long x 1" wide strips; fold in half and wire together. Glue wired center into hole in top of carrot. Glue two, 2" square patches onto carrot; embellish with buttons. Draw stitch lines on patches.
|
|  | | |
|
Ostara "Oops" 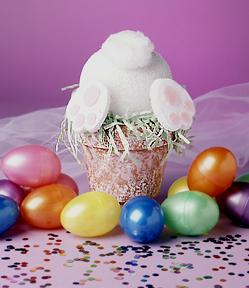
Designed By: Cindy Groom Harry & Staff
Typical Project Completion Time: 1-2 hours
(does not include drying time)
Oops Bunny is looking for those last few eggs hidden in the bottom of the flower pot! Lift him up to see that he's designed using Renuzit Adjustable Air Freshener!
MATERIALS NEEDED
STYROFOAM* Brand Products:
1 2-3/8" Long Eggs
14" Ball
Other Materials:
1The Dial Corp. Renuzit Adjustable Air Freshener
1 4" Clay Pot, 3 1/2" High
Acrylic Paint: White, Pink
Natural Sea Sponge
Felt: 11" x 5 1/2" Piece Pink; 1 6"x 9" Piece White
1 2" White Pom
Green Paper Crimps
Miscellaneous Items:
Low-temp glue gun & glue sticks, serrated knife, metal spoon, paint brush, tracing paper, pencil, scissors, toothpicks and paper towels.
INSTRUCTIONS:
1. FLOWER POT: Dip damp sea sponge in Pink paint. Blot excess off on paper towel. Lightly sponge paint pot; let dry. Repeat process using White paint. Cut paper crimps into approximately 3" lengths. Apply glue to inside top edge of clay pot. Press ends of paper crimps into glue, allowing paper crimps to drape over clay pot edge. Place Renuzit Air Freshener in clay pot. Trace bottom of pot onto white felt, cut out, trim if needed and glue to pot.
2. BODY: Using metal spoon, carve out inside of ball of STYROFOAM to fit on air freshener. Paint body White; let dry. Place body onto topper.
3. TAIL: Trim one end of pom to make flat surface and glue to body, centered above feet. Trim top of pom if necessary.
4. FEET: Cut foam egg in half lengthwise for feet. Using back of metal spoon, round cut edges of egg. Use spoon to shape three toes on large round end of each foot. Paint feet White; let dry. From white felt, cut two feet according to pattern. Glue to bottom of feet and trim as necessary. From pink felt, cut two large foot pads and six small foot pads according to patterns. Position and glue to bottom of feet. Poke toothpick into top of feet. Position feet onto body just above pot rim, approximately 1 1/2" apart; secure with glue.
5. GEL REPLACEMENT: When the original gel is depleted, simply replace with a new air freshener. For future projects: if your project base is decorated, remove dried gel. From a new container, remove new, non-toxic gel, then slip it over the post of the decorated base and reposition the decorated topper.
|
| | | |
|
For the Kids 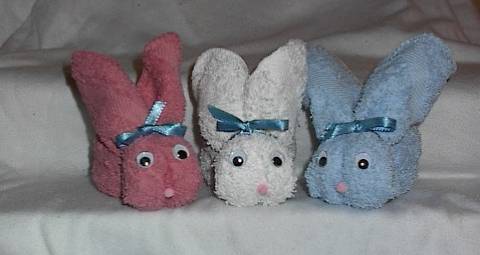
BooBoo Bunny Courtesy of CraftMall-Web
Materials Needed:
1 wash cloth in any color (pastels & whites are good for baby showers)
1 small to medium rubber band
2 - 10mm wiggly eyes
1 - 10mm pink pom nose (optional)
1 - 1/4" or 1/2" white pom tail
15" ribbon in coordinating color
poem
white craft glue
Procedure:
Start at a corner of wash cloth and roll it tightly toward the center. When you get to the center, start at the opposite side and roll that corner to the center also. This will form two coils in the wash cloth. Fold in half with the two coils to the outside.
Picture the ends as bunny ears. Grab the ends and bend straight upwards about four to five inches in from end. This fold forms the face. Hold the ears up and put a rubber band snuggly around the face (about an inch back from the fold). Fluff out ears.
Glue on wiggly eyes and an optional pom nose. (This bunny looks cute with or without a nose).
Glue a pom to tail. Print boo boo bunny poem, trim, punch a hole in corner and slide it onto ribbon. Tie the ribbon around neck to cover rubber band. Trim ribbon ends.
An ice cube popped into the center will "cure" most boo boos! (Hint: Plastic ice cubes aren't as messy. Just keep them in the fridge for emergencies.)
Poem -
If a boo-boo has you feeling crummy,
Stick an ice cube in my tummy.
Hold it to your boo-boo tight.
Soon everything will be all right!
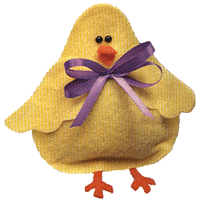
No-Sew Felt Bean Bag Chick
pattern Light Yellow and Orange Felt
Two 5mm Black Round Cabochons
2" Yellow Pom Pom
1/2 Yard 1/4" Lavender Satin Ribbon
Approx. 1 Cup of Navy Beans, Poly Pellets,
or Plastic Stuffing Pellets
Tacky Glue
Scissors
Clothes Pins
Wax Paper
Instructions:
Cut felt pieces using the pattern provided. Glue legs to the top surface of the bottom body piece as shown on pattern. Sandwich between pieces of wax paper, then place a stack of books on top for about 30 minutes.
Join body pieces by evenly applying a 1/4" wide line of glue around edge of bottom body piece, leaving a small opening to pour in beans or pellets. Matching edges, position the body pieces one on top of the other. Sandwich between pieces of wax paper, then place a stack of books on top for about 30 minutes.
Glue beak at dotted line to chick's head. Glue black cabochon in place above beak for eyes. Glue wings in place. Sandwich between pieces of wax paper, then place a stack of books on top for about 30 minutes.
Fill the chick's body with beans or pellets. Seal opening with glue and secure with clothespin until dry.
Glue yellow pom pom to bottom back of body for a tail, making sure it is positioned so the chick will sit upright.
Make a bow with the ribbon and glue under beak.
http://makingfriends.com/beanbag%20instructions.htm Chicks in a Nest 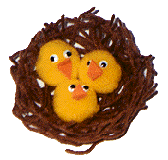
You need:
Brown Yarn (cotton works the best)
Three 1" Yellow Pom Pom
Orange Craft Foam
Six Wiggley Eyes
One Small Round Balloon
Liquid Starch
Tacky Glue
Scissors
Bowl
Newspapers
Instructions:
Blow up balloon to about 4". Tie off. Use a piece of yarn to hang it over your work area. (We worked on the kitchen counter and hung our balloon from a cabinet knob.) Place newspaper under balloon to catch drips.
Pour a cup of Liquid Starch into an old bowl. Cut several 4' pieces of yarn and place them into the starch. Make sure each strand is coated evenly with starch.
Wrap starched yarn pieces around balloon in all directions until balloon is covered to look like filigree. Cut and dip as many pieces of yarn as you need. There will be empty spots where the balloon shows through. Let dry overnight.
Cut down your yarn covered balloon. Pop the balloon and pull it out. Cut the yarn ball in half. You may want to set one half of the nest inside of the other for a fuller looking nest or use each half to make one nest.
Cut six small triangles for beaks. Glue two on to each pom pom to make it look like the chick's mouth is open. Glue on eyes. Place the chicks into the nest.
http://makingfriends.com/chicks&nest.htm |
|
|