Home
 |
 |  |  |
THE TERRARIUM: The indoor winter garden 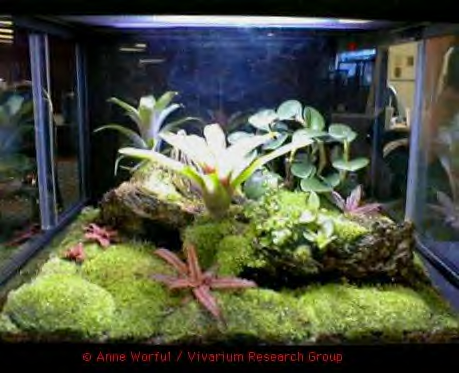
A Terrarium can be made for any room in the house. You can make an herbal terrarium for the kitchen or a fragant terrarium for the sitting room. There are numerous possibilities. You can make them as fancy or as humble as you desire. It is a marvelous way of bringing life and natures beauty into the house. Thank the God/dess for the wonderful gifts they share with us. 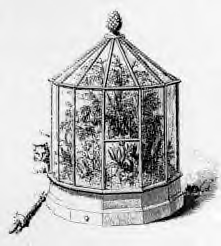
Terrarium History:
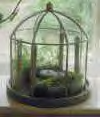
As early as 500 BC, plants were kept under bell-shaped glass jars for exhibit. But the terrarium in its modern form was invented by accident in 1827 by Nathaniel Ward, a London doctor. The fern case was discovered accidentally in 1827 by Dr. Nathaniel Ward, a London physician with a passion for botany. Dr. Ward built a fern rockery in his backyard, but the ferns kept dying, poisoned by the fumes from the city's factories. Ward was also studying moths and caterpillars and, while experimenting with a cocoon in a covered jar for observation, he noticed that several plants had grown in the bit of soil at the bottom of the jar. Among the bottled plants was a fern and, unlike the ferns in his garden, it looked healthy; Dr. Ward concluded that plants could flourish in London if they could be protected from the city's polluted air. Ward pursued his discovery in miniature greenhouses, which he named fern cases, and which are now known as Wardian cases or terrariums.
For the first time, horticulturists were able to bring back sensitive tropical plants in Wardian cases well-protected from salt air and changing climatic conditions during the long sea voyage. Ward's terrariums also became popular for growing the plants, and it became, in various guises, almost a domestic necessity. The poor had to content themselves with inexpensive rudimentary versions, but there were no limits for the rich. Wardian cases grew into miniature Taj Mahals and Brighton Pavilions, perfect vehicles for the contemporary love of elaborate ornamentation as well as living plants. The Wardian case was fashionable in the United States in the early 1860s, and hardly a self-respecting Victorian household was without one. Today's "Wardian Cases", or Terrariums, as we now call them, no longer have the need to keep our plants away from cold, and fouled air, but serve quite another purpose. With the dry air of our modern air conditioned, and forced air heated homes, many plants have difficulty thriving without a great deal of attention. Terrariums allow us to keep plants easily in our homes in attractive, decorative containers, while creating an environment which requires very little care. Closed terrariums, happy in their humidity filled surroundings, actually thrive on neglect.
Tips for building your miniture landscape: 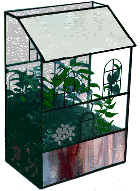
When summer becomes nothing more than a memory, and the garden has gone to sleep for the winter, many gardeners revert to 'indoor mode'. While caring for house plants is somewhat satisfying, a potted plant sitting alone, on a table is just not the same as a garden filled with flowers.
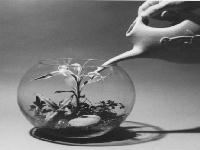
A terrarium is a collection of compatible plants grown in an enclosed, or partially enclosed, clear container.
Creating a terrarium filled with ferns and other small plants is a practical and fun way to have a miniature landscape inside your home. Their easy care is ideal for people who are too busy to spend a lot of time caring for plants.
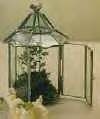
Your choice of containers is only as broad as your imagination. There are many ready made terrariums available, or you can use bottles, jars, aquariums, fishbowls, or even brandy snifters. The choice is yours.
Terrariums allow you to grow plants which require a high degree of humidity, which otherwise would probably perish in the dry atmosphere of a heated home.
Once the plants become established within your miniature garden, the terrarium begins to create a climate of its own. The plants transpire moisture through their leaves, which then condenses on the glass, and flows back to the soil. This 'rain effect' allows the terrarium to go for weeks without watering. Terrariums should never be grown in FULL sun!
For your new terrarium to succeed, it is extremely important that it is properly set up. As with any landscaping project, selecting appropriate plants is also very important. Plants need to be compact, and slow growing, as well as being able to survive the same conditions as their companion plants.
To avoid insect and disease problems, be sure to only use a good quality, commercial potting soil which has been pasteurized to kill any organisms which may be present. Additional planting materials, like the rock you will use for drainage, and stones or driftwood you use for landscaping accents should be rinsed with clean, HOT water, before using.
Inspect the plants you are using, very carefully, for signs of insects or disease, or any other potential problems.
For the beginner, I recommend that you choose a large, open container such as an aquarium. These are much easier to work in. With experience, you can advance to using 'chopsticks' and dibble sticks to plant your garden inside a small mouthed container, much like building a 'ship in a bottle'.
|
Preparation and Tips: Before you begin construction, get all of your tools, materials, plants, and of course your container, together in one convenient place.
Your planting foundation will consist of four layers.
The bottom layer is for drainage, and consists of pea gravel, pebbles, or very coarse sand.
Proper drainage is essential to ensure that the soil doesn't become over-saturated, which may lead to root rot, and the death of your plants.
Depending on the size of your container, you will want to spread at least an inch of drainage material evenly across the entire bottom of your terrarium. For large or deep containers, up to 3 inches of material may be used.
On top of the drainage layer, it is a good idea to spread a thin layer of activated charcoal (like you would use in your aquarium filter).
This layer will help to clean the air of the fumes caused when the organic materials begin to decompose.
The third layer is a thin cover of sphagnum moss, spread over the first two layers.
The purpose of this, is to prevent the soil from sifting down into the drainage layer, which would render it useless.
The final level is that of your soil. Many garden centers sell a potting mix specifically for terrariums. In reality, all that you normally get for the extra money, is sand added to their regular potting mix. You may choose a pre-mixed terrarium soil, or, if you prefer, just add one part coarse builders sand, and one part leaf mold (or humus) to each two parts of your usual mix. Never use beach sand in any potting mix! Do not add any fertilizer to the potting mix. It already has enough nutrients to last a long time. Too much will cause the plants to out grow their surroundings, much too quickly.
If your intent is to create a 'desert garden', be sure to add extra sand to the soil mixture, and additional gravel to the drainage level.
While the bottom tree layers are laid in evenly, the terrarium will seem more realistic if you add contour to the landscape, with different levels of soil. You can create terraces, valleys, and hills. Use your own special stones or pieces of wood as landscape accents, just as you would use driftwood or boulders in your outdoor landscape. Use your imagination.
The only difference in this case is that you must miniaturize everything you do.
If you intend to add critters of any kind (like lizards or tarantulas) to your terrarium, be sure to create a 'lake' somewhere within the landscape for them to drink from. This can be made out of any shallow dish, depressed into the soil.
Your terrarium plants should be chosen for their compatibility in lighting, watering, and humidity needs. Choose plants of varying height, shape, texture and color to create the desired landscape effect. Small specimens of plant varieties which do not grow too quickly are your best choice Once your decision is made as to where you will set your terrarium up, and you have chosen the appropriate plants, you are ready to go to work. Your new landscape should be structured and set up for the best visual effect from the viewers point of view. For example, if the garden will be viewed from all sides, a large plant should be planted in the middle, with lower plants around it. If your terrarium will primarily be viewed from only one side, the tallest plant should be placed near the rear of the container, with lower plants in the foreground. It is sometimes a good idea to use something special as a focal point in the landscape, such as a rock or stick to simulate boulders or logs. In these cases, or if you should decide to include a small statue as part of the garden, be sure that it is about the same scale as the plantings.
Before you do any planting, take your time and make certain that the arrangement of your plants creates the desired effect. While they are still in their pots, set the plants around inside the terrarium. (In narrow mouthed containers, it is a better idea to put your ideas down on paper.) Adjust the soil level to create hills at the back, and valleys in the foreground. Move your logs and boulders to different locations within the landscape. Step back a foot or two and see if your arrangement creates the desired effect. If not, do a little more rearranging, and check it again. When you decide that you have created the light 'scene', you are ready to do your planting.
No special tools are needed for planting your terrarium, unless you are using a bottle or other narrow mouthed containers. Most likely, you will use a kitchen spoon as your shovel, a fork as your rake, and small scissors as your shears. Narrow-mouthed terrariums require special tools to get the plant down into the terrarium and into the right spot. (i.e. a funnel to add the soil, long slender sticks to dig with, and some type of 'grabber' (unless you are good with chopsticks) to lower the plants in, and to actually plant them.) Once you have determined the arrangement of the plants and terrain, you are ready to landscape. Remove the plant from it's pot, and set it into a pre-dug hole. Unlike planting in the garden, it is not necessary to loosen the plant's roots. (In a terrarium, you don't want the plants to grow too quickly, and leaving the root ball compacted will slow the growth of the plants.) Firm the soil gently around the roots. Do not crowd the plants or place them directly against the sides of the container. Allow sufficient space for them to grow and spread, without becoming entangled in other plants. After planting, the soil should be slightly moistened. (Never allow the soil to be soggy, unless you are growing 'Bog' plants!) The lid should then be placed on your terrarium. Normally, a clear sheet of glass is used, but you may have to use your imagination to find the appropriate lid. (clear dishes, plastic sheeting, etc.) Check it frequently for the appearance of condensation on the glass. If large water drops appear on the glass, the container should be left open for a while, until any excess moisture evaporates. In some cases, it may be necessary to keep the lid slightly opened, to allow for fresh air circulation. However, a balanced terrarium should have a certain amount of moisture on the glass. A completely enclosed terrarium requires little or no watering. If it is not totally enclosed, you may have to water on a weekly or monthly basis (more often for completely open terrariums or dish gardens). The addition of water only becomes necessary if no condensation accumulates on the glass. When water is indeed needed, it should only be added a small amount at a time, since there is no place for the surplus water to run off. (Over watering increases the danger of fungus or mold). Recheck the next day, and if no condensation has appeared, more water may be added. When in doubt, always water less. Watch carefully so that plants do not become too dry and wilt. Generally, terrariums should not need fertilizing, but if the plants start to appear malnourished, you may feed them using a very weak mixture (1/4 strength) of an all purpose house plant food. Occasionally, it may become necessary to prune or to replace a dead plant. Diseased plants should be removed immediately. Although confined plants tend to grow very slowly, any plant that has outgrown its environment should be replaced.

| |
 | |  |
TIME TO BUILD: 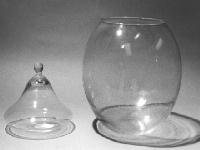
Step 1- Select a container big enough to hold 2 or more plants such as a fish bowl, candy jar, aquarium, canning jar or a large bottle (See figure 1)
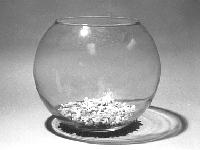
Step 2- Line the bottom and about 1/5 of the side walls of the container with pea-size gravel to provide drainage for excess water
(Figure 2 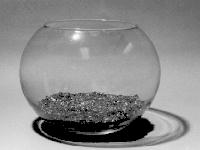
Step 3- Add a thin layer of charcoal over the drainage materials to absorb unpleasant odors which can occur when terrariums are over watered (Figure 3) 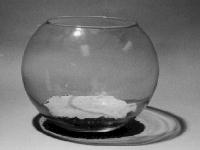
Step 4-The size and shape of the container will determine the amount of drainage material that should be used. A 1/2-inch (1.3 cm) layer is about the minimum and 1 1/2 inches (3.8 cm) should be enough for large containers. Place a piece of synthetic fabric over the drainage layer to prevent soil from settling into it and destroying its ability to drain (Figure 4). Materials, such as fiberglass draperies, nylon stockings, or discarded curtains are good choices because they are porous enough to allow water to pass through, fine enough to hold soil particles, and will not decompose rapidly.
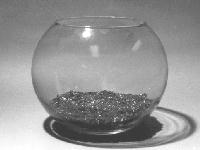
Step 5- Next, add enough sterilized soil mix to fill approximately 1/5 of the container, being careful to keep the soil off the walls of the container, (See Figure 5)( ). Premixed potting soils can be purchased for terrariums. These soils are sterilized and, therefore, do not contain disease organisms which may cause rot or deterioration of the plants. If you prefer, you can prepare your own soil by mixing equal amounts of garden soil and peat moss. 
Step6-After the soil has been arranged in the container, plants can be selected, arranged and planted. It may be helpful to work out the arrangement of the plants in an open tray that is about the same size and shape as the lower part of the container that you have selected for your terrarium (Figure 6).
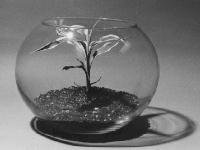
Step 7- If the terrarium is to be viewed from all sides, the largest plant should be planted near the center (see figure 7).
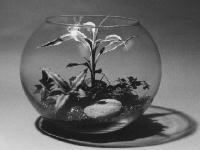
Step 8- ). If the terrarium is to be seen only from 2 or 3 sides, the tallest plant should be placed in the background. Place accessories such as stones, figurines, sand and driftwood at the desired location in the terrarium (See figure 8). Water plants sparingly since excess water will saturate the soil and may cause disease( as in figure 9). 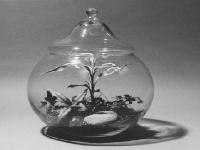
Step 9- Cover and place the terrarium where it is exposed to bright indirect light usually in a northeast or north window (As in figure 10)Avoid direct sunlight, as this will increase the air temperature inside the terrarium and may burn the plants. If the sides of the container become foggy due to the condensation of water, remove the lid until all condensation evaporates; then replace the lid.
Fact: Too much water is the number one terrarium maintenance problem. Terrariums should only be watered when the soil is dry to the touch. Since the container has no drainage, add only enough water to moisten the soil.The failure of many terrariums is due to over-fertilization. If fertilizer is added at planting, there is no need to add more unless the plants begin to develop a slight yellow coloration. If this happens, apply a water soluble house plant fertilizer at 1/4 the recommended rate.
TIP: To kill harmful disease organisms, moisten and bake the soil in a tray or pan at 200oF for 20 minutes, stirring every 5 minutes. A complete fertilizer such as 6-6-6 or 8-8-8 can be added after sterilization, although it is not necessary. If fertilizer is added it should be mixed in with the soil at the rate of 1 teaspoon per gallon of soil mix. The soil can be leveled or molded into contours and valleys with a tablespoon, teaspoon or any other blunt instrument.
|
|
|
|
|
 | |  |
|
|
| |
 | |  |
| Credits to Ron Gladkowski | |
|