Soft ornaments of Mr & Mrs Claus 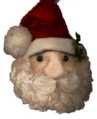
Materials Needed:
A piece of stocking ( approximately a 1 1/2 to 2" square)
Button and Carpet Thread
A small amount of fiber fill
(2) 6mm black beads
White Curly Chennile
Red Felt Scraps
White felt scraps
Hot Glue
Small white Pom Pom
A Long Hand Sewing Needle
Small plastic holly leaves Make a running stitch around the edge of the piece of stocking. Rounding off the corners.
While holding our thumb in the center of the stocking, tug on the thread to form a pouch. Stuff the pouch with fiber fill. Fill until firm. Tug threads to close the ball and tie using tail from the other end.
Form another tail after the knot on your thread. Insert needle in to the ball where you tied it off. Bring needle to the position of the first eye. Put bead on the needle. Pull thread and move the needle over 1/8" from where you came out. Insert needle back into "face" and out the back of the head. Bring needle to the position of the second eye. and repeat as you did the first eye. Tie off the thread. Knot well.
You will now form the nose, using the diagram. Stitch from A to B, pulling fiber fill up with the point of the needle to form the bridge of the nose. Pull needle out of the back and Pull threads tight. Bring needle from the back out point A and back into face, down to point D. Bring needle back in right next to where you came out and out again at point B. Pull tight, to form one nostril. Reapeat going from point B to point C and out at point A. Pull thread tight, Insert needle at point A through to the back and tie off well knoted. Leaving a long tail, insert needle from the back out at point E. Keeping the thread on the face of the ornament, insert needle at point A and out the back of the ornament. Use the tip of the needle to arrange the fiberfill to form a nose, and pull the tread tight. tit off. Repeat going from Point D to point B to form the other side of the nose. Use the tip of the needle to "sculpt the fiberfill into place. .
Remove the fiber from a section of the curly Chanille. Use it to form a mustache. Using a small dot of hot glue, anchor in place under the center of the nostrils.
Use the curly Chanille to form a beard. Glue in to place.
To form Santa's Hat, measure around the area of the head, from the center of his forehead around the back ( to meet the beard) and back around to the center of the forehead. Add 1/2". Use a salad or desert plate as a template for a circular edge. Measure 6" up from the center of the circular edge. Make a line down to both ends of the cicular edge.
Cut a piece of white felt using the edge of your hat as a template by 1/2" wide. Glue the white felt on to the edge of the hat. Glue the edge of the hat in place on Santa's head and glue the back seam of the hat. Bend the point of the hat down to the side of the hat, glue in place and glue the pom pom over the point of the hat. Glue a couple of Holly leaves on the other side of the hat.
Re thread your needle, leaving a long tail as you did earlier. Insert the needle inside the area of the hat where it is folded over. Make a loop of thread and stitch back into the hat. Knot off well. This gives you a thread to hang the ornament. I use a pencil to hold the loop while I knot it off.
Tips for Your Santa Ornament:
Use very strong thread and pull tightly.
Support hose are great to work with for soft sculpture. If you know any one who wears them, ask them to save their run ones. A button nose can be made using a small pink pom pom before you stuff the ball. Bring the needle in from the back, make a round running stitch around the pom pom. Pull the pom pom into the center circle of stitches with the tip of the needle. Pull the needle out the back and tug the thread as you work the pom pom into place. Tie off well.
Always knot the thread a couple of times before you cut it off your work. Be creative and use the basic face to creat other Christmas Ornaments.
Materials Needed:
A piece of stocking ( approximately a 1 1/2 to 2" square)
Button and Carpet Thread
A small amount of fiber fill
(2) 6mm black beads
White Curly Chennile
Red Felt Scraps (desert plate size)
White eylet trim scraps
Hot Glue
Small white Pom Pom
A Long Hand Sewing Needle
Small plastic holly leaves
Gold wire
Scrap of small red ribbon Directions
Thread your needle leaving a 3" tail, after the knot.
Make a running stitch around the edge of the piece of stocking. Rounding off the corners.
While holding our thumb in the center of the stocking, tug on the thread to form a pouch. Stuff the pouch with fiber fill. Fill until firm. Tug threads to close the ball and tie using tail from the other end.
Form another tail after the knot on your thread. Insert needle in to the ball where you tied it off. Bring needle to the position of the first eye. Put bead on the needle. Pull thread and move the needle over 1/8" from where you came out. Insert needle back into "face" and out the back of the head. Bring needle to the position of the second eye. and repeat as you did the first eye. Tie off the thread. Knot well.
You will now form the nose, using the diagram. Stitch from A to B, pulling fiber fill up with the point of the needle to form the bridge of the nose. Pull needle out of the back and Pull threads tight. Bring needle from the back out point A and back into face, down to point D. Bring needle back in right next to where you came out and out again at point B. Pull tight, to form one nostril. Repeat going from point B to point C and out at point A. Pull thread tight, Insert needle at point A through to the back and tie off well knoted. Leaving a long tail, insert needle from the back out at point E. Keeping the thread on the face of the ornament, insert needle at point A and out the back of the ornament. Use the tip of the needle to arrange the fiberfill to form a nose, and pull the tread tight. tit off. Repeat going from Point D to point B to form the other side of the nose. Use the tip of the needle to "sculpt the fiberfill into place. .
Insert needle from the back to a corner of the mouth. Making small stitches, make a running stitch where you want her mouth. Bring the needle out the back and tie off. Use the tip of your needle to "sculpt" the fiberfill to form the mouth.
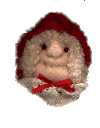
Use the curly Chanille to form her hair. Glue in to place.
To form Mrs. Santa's Hat, use a dessert plate for a template and cut out a circle of felt. Make a running stitch about 1/2" in from the edge of the circle. Snug up the thread to fit the head. Knot well and glue in to place.
To make Mrs. Santa's Colar: Make a running stitch along the edge of a piece of eyelet trim. Pull the thread so that the eyelet forms a circle. Knot well. Glue a the base of the ornament. Glue a small red bow on to place at the center front.
Re thread your needle, leaving a long tail as you did earlier. Make a loop for hanging at the top of the hatand knot well. I use a pencil to hold the loop while I knot it off.
Tips for Your Mrs. Santa Ornament
Use very strong thread and pull tightly.
Support hose are great to work with for soft sculpture. If you know any one who wears them, ask them to save their run ones. A button nose can be made using a small pink pom pom before you stuff the ball. Bring the needle in from the back, make a round running stitch around the pom pom. Pull the pom pom into the center circle of stitches with the tip of the needle. Pull the needle out the back and tug the thread as you work the pom pom into place. Tie off well.
Always knot the thread a couple of times before you cut it off your work.
Form glasses out of gold wire. Use a pencil to make a perfect loop. Glue the ear pieces in to Mrs. Santa's hair.
Be creative and use the basic face to creat other Christmas Ornaments.
|  |
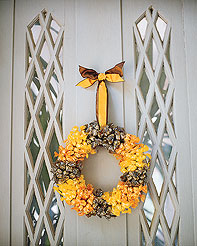
Pine and Cranberry Candle Cradle
Supplies needed:
1. pine boughs
2. 4-inch terra-cotta pots
3. sheer burgundy ribbon
4. wire
5. medium pinecones
6. 3 x 9" pillar candles
7. cranberries
8. glue gun
9. wire cutters
10. scissors
CREATING THE POT
Hot glue pieces of pine all the way around a terra-cotta pot, allowing the greens to extend about 1 to 2 inches beyond the rim of the pot.
Tie a piece of sheer burgundy ribbon around the pine in a knot.
CREATING A PINECONE CIRCLE
Create a string of pinecones by wrapping the end of a piece of wire around the base of the first cone, moving over a few inches to wrap the next cone until you have a string.
Bring the two ends together, forming a circle the same circumference as the top of the pot.
FILLING IT UP
Insert the pillar candle into the terra-cotta pot.
Place the pinecone ring over the candle and let it rest on the rim of the pot.
Fill the space between the candle and the pot with loose cranberries.
Use various-sized pillars and pots to add interest to your tabletop.
Candy Wreath 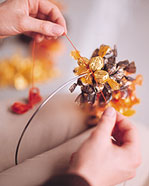
This wreath might be too tempting to remain intact for long. To make it, youll need 2 pounds of hard candy in twisted wrappers, an 8-foot length of embroidery thread, and a round wire wreath form that is 8 inches in diameter. First, tie the center of the thread to the form, leaving two ends of equal length. Hold the form between your knees (as shown), and make a loose knot on the outside of the form. Place ends of three wrappers through loop; cinch the knot, and knot again. Tie another knot to the form, thus securing the candies to it, then gently position them side by side. Tie three candies to the inside of the wreath form, completing the first ring. Once candies are tied all around the form, hang it from a ribbon.
GUMDROP ORNAMENTS
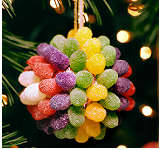
MATERIALS
Toothpicks, broken in half
Gumdrops
2- to 3-inch Styrofoam ball
10-inch length of ribbon
Insert one end of a toothpick into a gumdrop and the other end into the Styrofoam ball. Repeat until the ball is covered with gumdrops. Tie the ribbon around the ball to hang it on the tree.
TESTER'S TIP: Use a Styrofoam cone instead of a ball and create a tree centerpiece covered entirely with green gumdrops.
Originally published in FamilyFun magazine.
CANDY GLASS
Baking these ornaments is a job for parents, but let the kids unwrap the candies.
MATERIALS
Holiday cookie cutters
Hard candies and sprinkles (optional)
10-inch length of ribbon
For a mold, wrap the bottom and sides of a cookie cutter with foil. Set on a baking sheet and coat with cooking spray. Fill each cookie cutter with a single layer of candies. Bake in a 350-degree oven for 10 minutes, or until melted. Add sprinkles, cool for 2 minutes, then use a chopstick to poke a hole near the top for hanging. Once cool, remove from the mold and hang with a ribbon.
|
|
  |
| |
|
Gingerbread Garland 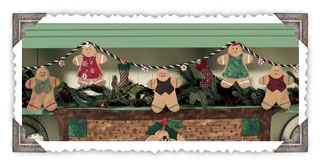
Materials Needed
Gingerbread boys and girls:
1/4 yard felt (72" wide) or
1/3 yard felt (36" wide)
Clothing - Colorful scraps and pieces
Elf Stockings: Colorful scraps and pieces
Cording - 2 1/2 yards
Candy buttons - 6
Assorted beads, buttons, embroidery floss, and trims
Heavyweight Fusible Web - 1/3 yard
Template plastic
Making the Gingerbread Boys and Girls
1. Cut ten 5" x 6 1/2" pieces of felt. Trace pattern for gingerbread boy and girl onto template plastic. Trace around template onto five pieces of felt, making three boys and two girls.
2. With wrong sides together, layer traced felt pieces from step 1 with remaining five felt pieces. Stitch on traced line. Cut about 1/4" from stitched line with pinking shears.
3. Trace patterns for dress and vest onto paper side of fusible web. Referring to Quick-Fuse Appliqu directions, fuse clothing onto gingerbread kids.
4. Add beads for eyes, buttons to clothes. Refer to Embroidery Stitch Guide to embroider mouths using stem stitch.
Making the Stockings
1. Cut two 4 1/2" squares from each of your assorted festive fabrics. Cut as many as you will need for your garland. We made two.
2. Trace elf stocking pattern onto template plastic and cut out.
3. With wrong sides together, position fabric squares together and trace around template on right side of fabric.
4. Leaving top of stocking open, sew on drawn line. Trim seam allowance to 1/8" and trim stocking top along drawn line.
5. Trace elf stocking cuff pattern onto template plastic or paper and cut out. Position on fabric for cuff, trace, and cut out. Glue or fuse onto stocking top. Stitch back seam of cuff using the same seam line as stocking.
6. Fill your elf stockings with candy or other treats and they're ready to hang on the garland.
Finishing
Referring to the color photo for placement, position the gingerbread kids, stockings, and buttons along the cording, spacing them about 6" apart. Using clear, monofilament quilting thread, make a loop at the top of each felt figure and stitch to cording so they hang below the garland. Add stockings in the same manner. Sew buttons together in pairs. Tie a piece of clear thread between buttons and attach to cording.
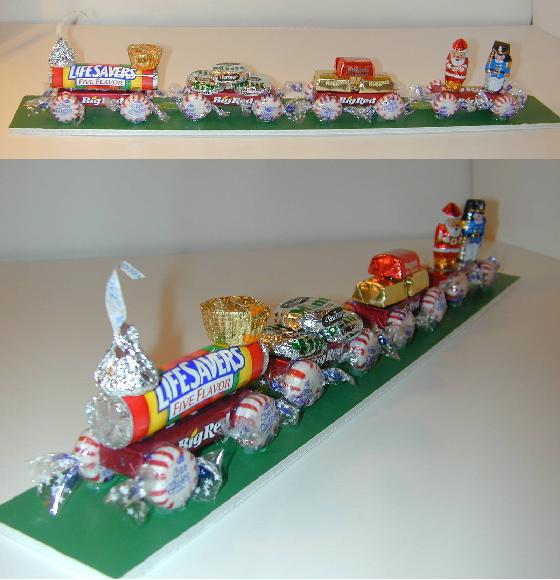
Candy Train Ornament 
Make ornaments or decorations using an assortment of candies - a train, a race car, a plane, or a reindeer. These can be hung on trees, tied to packages, or used as decorations on a table.
Young children will need supervision with the low temp hot glue gun, but it works a lot better than craft glue.
Parental supervision is recommended.
This project is rated EASY to do.
What You Need
Low temp hot glue gun
Ribbons or yarn for hanging
1 roll of lifesavers (cylinder about 3 1/2 inches long)
1 small package of gum (3" x 3/4" x 3/8")
4 round wrapped candies (I used peppermints)
1 Hershey's Kiss (this is by far the best shape I've found)
1 large rectangular caramel like candy - I found a 3-color candy called "Sundaes" in the bins of assorted Brach's candy bins at my supermarket. You can also try using multiple starbursts or caramels, etc. It's about 1" x 1" x 3/4"
1 mini chocolate bar (1 1/2" x 1" x 3/8") I got mine from Hershey's in a big bag
A creative imagination
How To Make It
Glue the lifesavers roll to the gum package, letting the lifesaver roll stick over at both ends. Glue the peppermints to the lower sides for wheels.
Push the Sundae/caramel onto the lifesaver body to make the cab of the engine, so that it will glue on better. Glue.
Cut the paper off the top of the Hershey's Kiss, and flatten the point a bit by pushing it against the table. Put a good sized glob of hot glue on the tip, and then glue it to the lifesaver roll as shown.
Glue the little chocolate bar on top of the cab for the roof.
You're done!
You can also substitute a rectangular candy package for the lifesavers - we found some called "Jolly Rancher" that worked, or glue a set of Starburst Candies together.
If you want to make some cars for the train, simply use rectangular candies in various combinations with 4 round wheels.
Tips
About finding the candies: Think shapes. Go to your local store and look for rectangles, circles, shiny wrappings, etc. I found small packages of gum in a large multi-pack of gum. You can also remove the gum sticks from the package and glue them together to create a 'small pack' sized set of gum.
I used wrapped peppermints and folded the extra cellophane around to the back and glued it down before gluing the candy to the project. And don't be afraid to combine several candies (like the small squares of Starburst candies) to make larger shapes. This is an exercise in creativity. Do not ask me where to buy a certain candy, or to mail you some. Find something that will work at your stores, these instructions are just to get you started! Experiment with your candies and try them different ways before you begin gluing, and most of all, have fun!
This project was contributed by:
Grace Sylvan
|
|
|
|